With all the additional sound banks that Korg has given us in the Version 1.2.0 upgrade, there’s now plenty of room to store new sounds. You can now load all 15 of our Nautilus PCG’s and still have room for more! Here’s how everything is set up:
Vol 1 EXi Super Synths
Programs = Bank p
Combis = Bank H
Vol 2 Vintage Synths V1
Programs = Bank q
Combis = Bank I
Vol 3 Electric Guitars V1
Programs = Bank r
Combis = Bank J
Vol 4 Hit Factory
Programs = Bank s
Combis = Bank K
Drum Kits = Bank m – Slots 225-240
Vol 5 Analog Sensation
Programs = Bank t
Combis = Bank N
Vol 6 Sonix Bliss
Programs = Bank o
Combis = Bank L
Vol 7 Wave Machine
Programs = Bank n
Combis = Bank m
Drum Kits = ugg 257-272
Wave Sequences = ugg 566-597
Vol 8 Classic Rock
Programs = Bank m
Combis = Bank G
Vol 9 Electric Pianos
Programs = l
Vol 10 Dark Energy
Programs = Bank k
Combis = Bank F
Vol 11 Electric Guitars V2
Programs = Bank j
Combis = Bank E
Vol 12 Vintage Synths V2
Programs = Bank i
Combis = Bank D
Vol 13 Electric Guitars V1
Programs = Bank h
Combis = Bank C
Vol 14 Vintage Synths V3
Programs = Bank g
Combis = Bank N
Vol 15 Soundtrack Mix
Programs = Bank f
Combis = Bank F
Best to create a KIDNEPRO folder on your Nautilus hard drive and save our sounds into that folder. Remember that any library that contains new samples will also include a .KSC file and User_Bank.KSC file. New samples must be loaded each time you turn on your Nautilus. So, best to set up any libraries that contain new samples in the Nautilus “auto load” so they load automatically when you power up Nautilus. Here’s how its done:
For maximum flexibility, best to keep your KSC files separate and enable/disable each KSC on the Auto-Load page as desired. Just follow these three simple steps.
1- After you download and save our files to your USB drive, find the Kid Nepro Nautilus folder and copy it to your Nautilus Internal Hard Drive. To do that, choose the folder and go to “Utility/Copy”. Change the Drive Select to “Internal HD”, then choose “Paste”.
2- Go to Media/Disk/Load. Find the Kid Nepro folder, choose open and choose the Kid Nepro User Bank KSC. Load the User Bank KSC into memory.
3- Go to Global/KSC Auto Load. The newly loaded KSC will already have been added to the list automatically. Enable the Auto-Load checkbox for the KSC. Everything should now load when your start Nautilus.
You can check it by choosing “Do Auto Load Now” without having to restart. Remember to check the box next to each file that you would like to load at start up. Note that the Preload Data KSC file must be loaded during start up since many of our sounds require that the factory drum samples be loaded during start up.
For more info on all our Nautilus Sound Libraries, go to:
All our Korg Nautilus sounds are delivered via our free download delivery. After you place your order, we send you a link where you can download and save our sound files to your computer hard drive. From the computers hard drive, you save the files to a USB thumb drive. Then you can load the sounds into Nautilus and use them in your music. Here’s how:
First insert your thumb drive into your computer and save the Kid Nepro folder from your computer to the thumb drive. Make sure you unzip the Kid Nepro folder that you downloaded before saving to the drive. Insert your thumb drive into Nautilus “after” you turn Nautilus on and it loads your system files and sounds. Don’t insert the drive until everything boots up.
Wait a few seconds seconds after you insert the drive and then go to Nautilus “media mode” and choose “Drive Select”. You have to change the drive from “Internal HD” to your drive. Your drive should be listed just below the Internal Drive. There’s an arrow which lets you see all the drives and select your drive. If you can see your drive and the Kid Nepro folder, then you’re all set and can follow the loading instructions in the PDF file.
If you don’t see your drive listed under the Internal HD drive, then you can “format” your drive on the Nautilus. To do that just go to the Nautilus “Utility” section in Nautilus disk mode and choose the arrow on the top/right part of the screen. There is a pulldown menu that has a few options. Just choose “format”. Then take the drive back to your computer and save the Kid Nepro folder again. Then insert the drive into Nautilus again and follow the loading instructions in the PDF that’s included with your download.
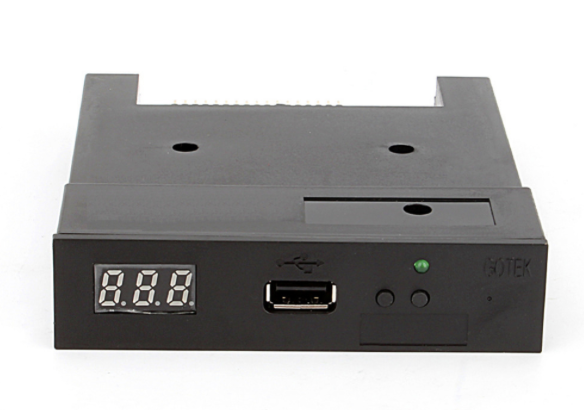
Kid Nepro is one of the few sound companies still supporting vintage samplers that use floppy disks. However, times have changed and it’s no longer possible for us to continue to offer floppy disks delivered by snail mail. So, we have now made available our vintage sampler floppy disks as “image files” (.img) that you can download. No more waiting for floppies to arrive in the mail. The disk image files are exactly the same as the floppies. You just have to create your own floppy disks from the images.
Please note that you need a PC computer with an “internal floppy drive” in order to create your own floppy disks with the image files that you download. The “OmniFlop” app that we provide with your order lets you create the floppy disk images. The app is for PC’s only and you can’t do this with an external floppy drive. It will work with internal floppy drives only. Note that best to use WinXP with an internal floppy drive using the OmniFlop replacement floppy driver and the OmniFlop wizard app.
In addition to using the old hardware and Omni Flop, there are also more modern ways to use our disk images. If you have USB Floppy Drive Emulator connected to your sampler, which replaces the floppy drive, you can save the images that you download from us to that device and load the sounds from there. Quick & simple!
If you have the right hardware set up, then purchase the images and your ready to roll. If you’re still using floppy disks, remember to purchase the correct floppy type that’s compatible with your sampler. Many of the old samplers use the “High Density” 1.44 MB disks. A google search will turn up some places that still sell them. However, a few old samplers will only read “Double Density” 720k disks. Those can be pretty hard to find, but you can still get some if you’re lucky!
There are several floppy drive emulators on the market. Not all of them will work with your sampler. So, google around to make sure you get the right one!
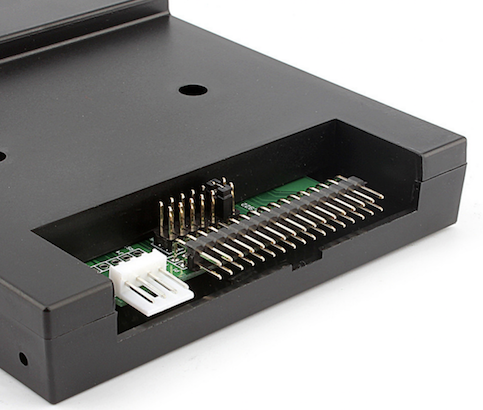
Here’s a pict of the Gotek floppy disk emulator:
Here’s a video which explains how to replace your floppy drive. A google search will also show you several examples of floppy drive emulators. If you need any more info contact us at: support@kidnepro.com. Good luck & happy sampling!
All our Kronos sounds are delivered via our free download delivery. After you place your order, we send you a link where you can download and save our sound files to your computer hard drive. From the computers hard drive, you just need to save the files to a USB thumb drive. Then you can load the sounds into Kronos so you can use them in your music. Here’s how:
First insert your thumb drive into your computer and save the Kid Nepro folder from your computer to the thumb drive. Make sure you unzip the Kid Nepro folder that you downloaded before saving to the drive. Insert your thumb drive into Kronos “after” you turn Kronos on and it loads your system files and sounds. Don’t insert the drive until everything boots up.
Wait about ten seconds after you insert the drive and then go to Kronos “disk mode” and choose “Drive Select”. You have to change the drive from “Internal HD” to your drive. Your drive should be listed just below the Internal Drive. There’s an arrow which lets you see all the drives and select your drive. If you can see your drive and the Kid Nepro folder, then your all set and can follow the loading instructions in the PDF file.
If you don’t see your drive listed under the Internal HD drive, then you have to “format” your drive on the Kronos. To do that just go to the Kronos “Utility” section in Kronos disk mode and choose the arrow on the top/right part of the screen. There is a pulldown menu that has a few options. Just choose “format”. Then take the drive back to your computer and save the Kid Nepro folder again. Then insert the drive into Kronos again and follow the loading instructions in the PDF that’s included with your download.
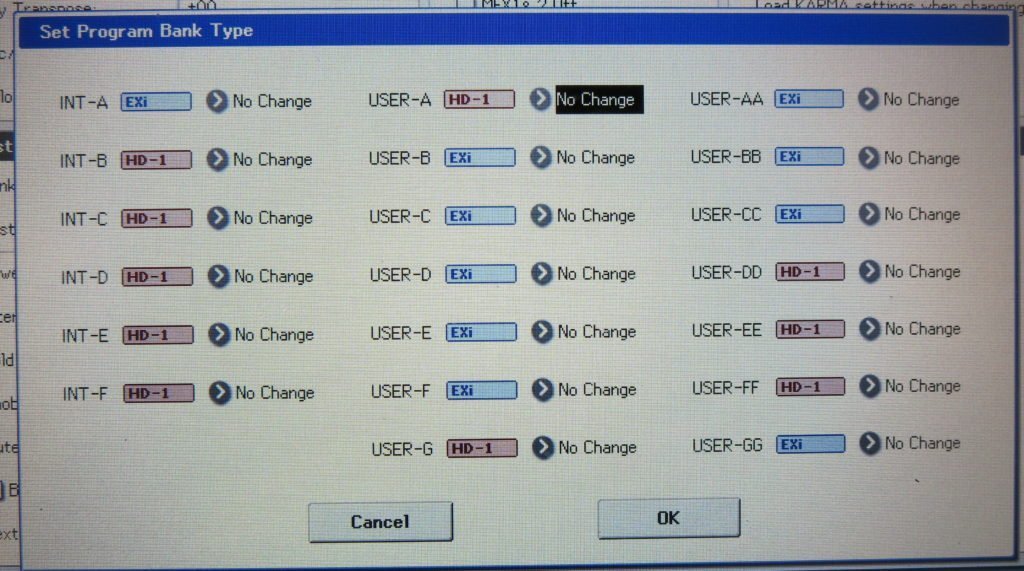
If you’re having problems loading our Kronos sounds into certain program bank locations, you need to make some adjustments in your Global settings. Remember that Kronos sounds have two different bank types:
1- HD-1 – Contains new sample data 2- EX1 – For synth type data – Mod7, AL-1, MS20, Polysix, EP-1
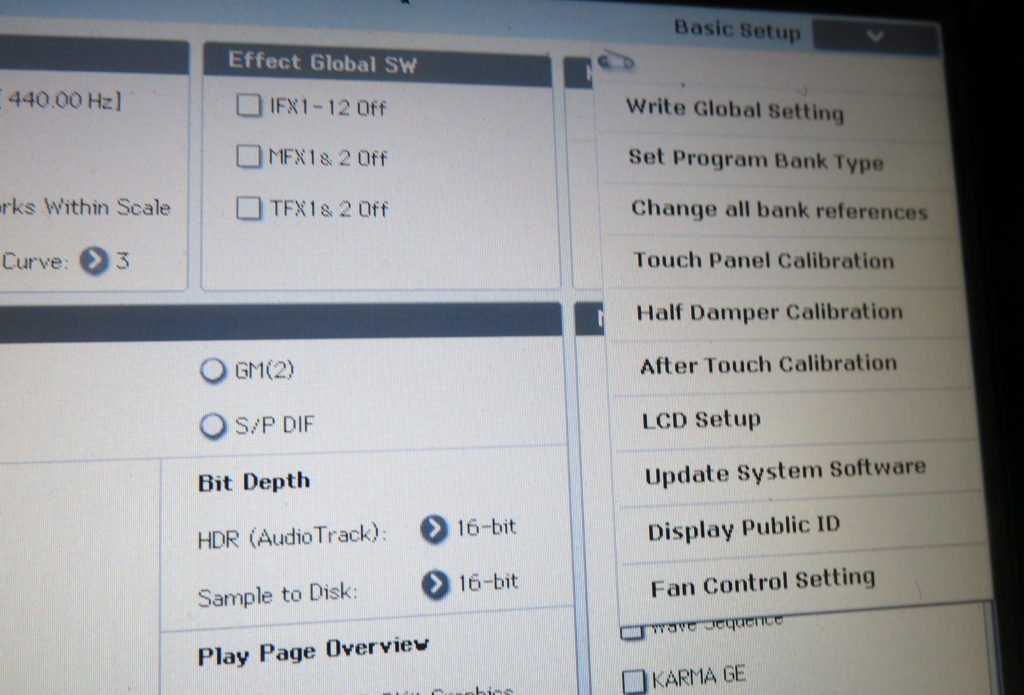
So, you have to match our PCG bank type to the same bank type in your Kronos settings. To do that, go to:
Global / Basic Choose the arrow on the top/right section of your screen Choose “Set Program Bank Type”
Then choose EXi or HD1 depending of which set of sounds you’re loading. Anything with samples and a KSC file goes into an HD=1 bank. All the rest get loading to EXi.
Quick, simple and easy to adjust as you fill up your Kronos with some cool new sounds!
Kronos Electric Guitars V3 includes 16 guitar loops. There’s a few things to be said about how they work, so we thought it would be best to write a blog post about how to use them.
Each loop has been loaded into the Kronos Drum trackand can be accessed from there. The loops are saved in the User-DD Program Bank, Programs 32-47. However, while the loops are stored in those program slots, the actual program is blank, except for when you turn on the drum track and you will hear the loop play. All you will hear is the loop. Nothing else is included in the program.
The real fun begins when you take those programs and add it to a combi. The loops are added to Part Ten, where the Drum Track usually goes. When you do this, you sync the loop to everything else in the combi. So, you can have drums, bass and guitar all playing at the same time. Any combi that has a guitar loop included will have the key that the loop is in as part of the name. For example, Combi #4 – Big Bad Guitarzan Eb LP, means the loop in that combi is in the key of Eb.
We let you know the key of each loop to give you a heads up on what key to play when the loop is running. The limiting thing about the loops (while they sound great), is that they will only play in “one key at a time”. So anytime the loop is playing in (for example) Big Bad Guitarzan Eb, you have to play in the key of Eb. The same goes for any combi that has a guitar loop included.
We have set all the combis that use the loops so that some of the eight KARMA scenes have the loop tuned on and some of them have the loop turned off. So, during the scenes that the loop is turned off, you can play in any key that you want. You can always mute part ten if you want to turn off the loop at any time.
Another thing to note is the tempo of the combi has to match the tempo of the program, or else the loop will not play correctly when inserted into the combi. So, don’t change the tempo of the combi while the loop is playing. Also note that when your creating you own combi using the loop that you have you make both the program and combi the same tempo.
Rock Loop 1 – 60.52 BPM
Rock Loop 2 – 65.72 BPM
Rock Loop 3 – 120.74 BPM
Rock Loop 4 – 56.16 BPM
Power Loop 1 – 70.22 BPM
Power Loop 2 – 66.26 BPM
Power Loop 3 – 55.29 BPM
Power Loop 4 – 87.91 BPM
Power Loop 5 – 68.45 BPM
Loops with the very fast tempos, like Chung Loop 4 – 201.43 BPM are should actually be set at half that tempo (100.71) to have everything sync up correctly.
Please note that not all the guitar loops have been used in our combis. The ones that were left out can be inserted into any custom programs or combis that you would like to make yourself. We choose not to use the loops in all sixteen combis, since we wanted to have a mixed set of both traditional and guitar loops set up in the drum track. Either way it’s something cool and new for Kronos. We hope you will enjoy the results.
Now that Korg has given us the ability to save our new samples as “user banks”, it is now possible to use several sound libraries at the same time. It’s worth taking an hour or so to set up everything, since after it’s done then all you have to do is turn on your Kronos and everything will be loaded and ready to go. After your done, you can just do a “save all” and save all your the PCG data in memory. Then if you have a disk crash, system error or if you want to load in something else, getting everything back will be easy.
Listed below is an overall view of exactly how we have things set to load for each of our PCG Kronos Sound Libraries. Note that this is just how you set up the PCG files. For more info on how to deal with the KSC sample files, visit this link.
NOTE: Getting several of our Kronos sound libraries into memory at the same time requires moving some PCG files around. Note that Kronos 2 PCG’s are set up a little differently on some libraries.
V2 & V7 Both use Program USER GG
V4 & V8 Both Use Program USER CC
V9 & V10 Both Use Program USER AA & Combi USER A
V1 & V7 Both use Combi USER G
V3, V4 & V7 Both use Combi USER C
Since two sound libraries can not occupy the same bank at the same time, you have to move one of them to another bank in order to be able to access both at the same time. To do that, follow the instructions AT THIS LINK:
Don’t forget to check your combis after you have moved things to see if they are referencing the correct programs. If they sound weird, then they are probably not set up correct.
V1 Vintage Synths – Programs – USER G – Combis – USER G
V2 Soundtrack Mix – Programs – USER GG – Combis – INT G
V3 Hit Factory – Programs, Drum Kits – USER EE – Combis – USER C – Kronos 2 = Combis USER F
V4 Sonix Bliss – Programs – USER CC – Combis – USER C
V5 Dark Energy – Programs – USER BB – Combis – USER B – Kronos 2 = Programs USER CC – Combis USER C
V6 Electric Guitars – Programs – USER FF – Combis – USER A – Guitar Loops – User Drum Patterns 000-015
V7 Wave Machine – Programs, Drum Kits & Wave Sequences – USER GG – Combis – USER G
V8 Analog Sensation – Programs – USER CC – Combis – USER C
V9 EXi Super Synths – Programs – USER AA – Combis – USER A – Kronos 2 = Programs USER CC – Combis USER C
V10 Vintage Synths 2 – Programs – USER AA – Combis – USER A – Kronos 2 = Programs USER CC -Combis USER C
V11 Electric Guitars V2 – Programs USER-CC Bank and Combis USER-C Bank
V12 Vintage Synths 3 / Midi Mix – Programs USER-CC Bank and Combis USER-C Bank
V13 Electric Pianos – Programs USER-GG
V14 Classic Rock – Programs USER-GG and Combis USER-G Bank
V15 Electric Guitars V3 – Programs USER-DD and Combis INT-D Bank
Load your wav file loop into the Korg Kronos workstation via the disk load. Remember that wav files must be 16 bit. Go to “sampling” and choose the next available Multi Sample slot.
Choose Rename MS and give it a new name. Lets name it “Drum Loop 1”.
Choose page 2: “loop edit”
Go to top right and choose the arrow and scroll to “time slice” and choose it.
That will get you to the “set sample tempo” page:
Beat = how many 1/4 note beats in the loop (1 bar = 4 beats – 2 bars = 8 beats etc.)
Source BPM = must match the tempo of the loop. If you know how many 1/4 note beats are in the loop just set it to the correct amount and the BPM will automatically fill in the correct tempo.
Choose “ok”. That will bring you to the time slice page.
Note the “sensitivity” parameter is set to 25. For most loops it’s OK to leave it at 25. However some loops require you to lower the sensitivity. If you find that your loop has a “gap” in it (Usually one measure) then you need to lower the sensitivity parameter. Usually lowering it to about 10 should work, however we have used loops where it had to be lowered to as low as 3 to get it to work right. Experiment to find the correct setting for your loop. Remember that the higher you set the sensitivity, the more slices your loop will have and the more you will be able to change the tempo of the loop without affecting the pitch.
Choose “save”. That brings up the “save samples & ms” page.
The top section should be the same: Beat & BPM that you already set at the “set sample tempo” page. Do not use the time stretch function or change anything over there. The “save with” parameters must be set as follows: Check program and choose the program slot where you want to save the time sliced loop data. You must also save the program and set it’s category to “drums”. Then it will be visable to the drum track parameters. You can do that later.
Check “seq event” and “pattern” Below you can keep the song, pattern and meter the same unless you already have something else stored in the song or user pattern memory. The meter should stay at 4/4 unless your loop happens to be in another time signature.?Leave the RPPR settings as is: C#2 – Track 1
Choose “save”. That brings you back to the time slice sample page. Choose “exit”
Note that your next available multi sample slot will be filled in with the time slice data. Before moving ahead you should also rename your multi sample. Name it: Drum Loop 1 Time Slice.
Go to “sequencer mode” – Page 10 “Pattern/RPPR”. Hit the start/stop button and if everything has been set correctly you should hear your loop playing. If the loop plays and there is a gap then you have to go back and lower the sensitivity parameter as stated above.
If the loop plays smoothly then first give your drum pattern a name and then choose the arrow in the top right corner of the page and choose “convert to drum track pattern”. Pick where you want the pattern to live and choose “note only”. Leave “all patterns available” blank.
If you have done everything correctly, your sample loop has been converted to a drum pattern and the extra bonus from time slicing the loop means that you can now change the tempo of the loop without affecting the pitch. Note that some loops do this better then others. Large changes in tempo usually affect the sound of the loop.
To get the new user drum pattern into the program or combi that your working with just choose the program that you assigned the time slice data to and the user drum pattern that you assigned the loop to.
After your done, don’t forget to “save sampling data” as a KSC file and also save your new programs/combis as a PCG file. Check out our “working with samples” tutorial for more info.
Here’s how to have our sample libraries load automatically when you start Kronos. For maximum flexibility, best to keep your KSC files separate and enable/disable each KSC on the Auto-Load page as desired. Just follow these three simple steps.
1- After you download and save our files to your external hard drive, find the Kid Nepro Kronos folder and copy it to your Kronos Internal Hard Drive. To do that, choose the folder and go to “Utility/Copy”. Change the Drive Select to “Internal HD”, then choose “Paste”.
2- Go to Disk/Load. Find the Kid Nepro folder, choose open and choose the Kid Nepro User Bank KSC. Load the User Bank KSC into memory.
3- Go to Global/KSC Auto Load. The newly loaded KSC will already have been added to the list automatically. Enable the Auto-Load checkbox for the KSC.
Everything should now load when your start Kronos.
You can check it by choosing “Do Auto Load Now” without having to restart. Remember to check the box next to each file that you would like to load at start up. Note that the Preload Data KSC file must be loaded during start up since many of our sounds require that the factory drum samples be loaded during start up.
When programming our Kronos Hit Factory collection, I created six new drum kits using new samples. I quickly found out that there are several steps involved in creating the drum kit and that they all must be done in the right order for everything to work as planned. I figured it would be a good idea to take some notes!
First assemble all your wav samples into one folder. My kits all contain 88 samples and I’ve mapped each sample to one note across the entire 88 note keyboard. The samples that make up the kit usually consist of several kicks, snares, toms, open and closed hi hats, ride and crash cymbals and assorted percussion. Then depending on the style of music your making you can do just about anything. A typical Hip Hop Drum Kit would also have voice samples, orchestra and horn hits, noises, scratches etc.. After everything is prepared your ready to start.
1- Save your folder with the wav samples to your USB hard drive or memory stick. Connect your drive/stick to the Kronos USB port.
2- Choose “disk”, find your USB drive and then your wav folder. Choose your folder and choose “open”. Choose “multiple select”, select all your files and choose “load”. All your files will load in a few seconds.
3- While still in disk mode choose the save tag at the bottom, then choose the save arrow on the top and choose “save sampling data”. You are now about to create a Korg .KSC file – which will save all your samples into one easy to load file. Name your .KSC file, choose “all samples” and then choose OK. Depending on how many samples you have and how fast your drive/stick is, it should take a few minutes for all the samples to be saved to your drive or stick.
Note: There are a couple of different methods of saving your KSC file, depending on which OS your running. To be able to use the best features, including creating your own “User Sample Banks” that will stream from the Kronos SSD, you need to be running version 2.0.2 or later. We recommend that you update to the latest Kronos OS whenever a new OS is available at korg.com. Please check page 154 on your Kronos Operation Guide pdf file that comes with the 2.0.2 download folder for more info on saving KSC files. The 2.0.2 OS will also let you transfer the sounds via ftp in certain set ups. Check your Kronos manuel for more info.
After you have saved the file, remove your drive/stick from the Kronos, connect it to your computer and copy the .KSC file to your computers hard drive. Then you will have a back up in case anything happens to the file on your external drive or stick.
4- Go to Program Mode and pick any of the factory drum kits. You can find them in the INT-F and USER-A banks. Pick the one that comes closest to the style of drum kit that you want to recreate with your new samples. For this example, lets stick with the Hip Hop style and pick Program UA-026 – Urban Hip Hop Kit. Choose the main arrow and choose “write program”, rename it “My Hip Hop Kit” and write the kit to any empty program slot in your Kronos. Essentially you are making a copy of the Urban Hip Hip Kit to work with so you will not change the original program.
5- Go to the “My Hip Hop Kit” program that you just created in the empty slot and go to “global/drum kit”. On the top/left arrow your should see – Urban Hip Hop Kit. Highlight it. Under Drum Kit choose the next empty drum slot. It should be C06. Under the “sample setup” arrow choose “write drum kit”, then choose OK.
If you have done everything correctly the Urban Hop Drum Kit will now get written to C06. Go back to your kit and choose “rename”, give your kit a new name (something like “my hip hop kit”), choose the sample setup one more time and choose “write drum kits”, choose OK and your new drum kit has now been added into the Kronos internal memory.
Now your almost ready! But first, go to Program/OSC/Pitch to change the multi sample to your new sounds.
I have our Drum Kits stored in the Global User-EE Bank.
6- Before you start to assemble your kit, you must do one more very important thing. Go back to program mode, find your new “My Hip Hop Kit” program and under OSC/Pitch change the “multisample” from “Urban Hip Hop Kit” to “ My Hip Hop Kit”. Under the main arrow choose “write program” and your all set. If you don’t do this and then begin editing your kit you will be changing the settings on the factory Urban Hip Hop Kit and any program or combi that uses that kit will also change therefore creating a big headache for you!
Fear not. If you happen to change one of the factory kits you can always reload the factory settings.
7- Go back to Global mode – Drum Kit and now your ready to begin assembling your new drum kit. Start with Key A0 if your working on a 88 note keyboard or C2 if your on a 61 note – 5 octave keyboard. You can have up to eight samples on each note. Each with different velocity settings if you wish, Just change the ROM Mono Setting for each sample to RAM Mono if your new samples are in mono or RAM Stereo if they are stereo samples. There are several parameters that you can tweak for each sample to get the sound just the way you want it.
One last thing to note is which samples to put on which keys. This is important since the Kronos internal drum patterns and GE’s use midi note numbers to trigger the samples in each pattern. The easiest way to deal with this is to go through each sample one at a time and simply replace the factory sounds that’s in the Hip Hop Kit to a similar type of sound in your new “My Hip Hop Kit”. In other words, if there is a kick drum on note C1 of the factory kit, then replace the factory kick drum with one of your custom sample kick drums. A snare would replace a snare and so on. Doing this will assure that everything will sound right when triggering your new kit with the factory drum patterns or GE’s.
After you have done some editing don’t forget to again go to the sample set up arrow and choose “write drum kit” to save your new kits changes into memory. Then for safe keeping go back to media mode and save your program and user drum kit as a PCG file. Don’t forget to choose “user drum kits” and the User Bank you have stored the kits into when saving your PCG file.
Remember that while the PCG file stays in memory until you load in something else, you must load in the KSC file each time you power up your Kronos. Just load in the .KSC file that you created with your new samples and you should be ready to start making beats in a couple of minutes. You can also solve this problem by saving your KSC to the Kronos internal hard disk and setting your KSC file to autoload when Kronos starts up. That’s all done in global mode and makes it even easier to start working right away.
If you need any info please contact us at: support@kidnepro.com or just post a reply on our blog.


Recent Comments